In the 21st century, making photographs has evolved into a process. First, you capture the image with your digital camera, and then you transfer the electronic file into post production editing. There are several post processing software systems, but Adobe Photoshop is by far the most popular for beginners. In this article, I will address the basics of getting started with a few of the Photoshop tools you will use most often. These are the keys to developing your images in the digital darkroom. I am using the latest Photoshop CC for this article, but these tools can also apply to Photoshop CS5 and CS 6.
Remember that Photoshop isn’t just for the professionals. It’s a powerful design software with a wealth of tools that can seem overwhelming at times. With time and patience, you can teach yourself how to use it to create memorable photographs.
When you open Photoshop, the tool icons appear within a vertical panel on the left-hand side of the screen. If you hover your cursor over each tool, a pop up will tell you the name of the tool.
The Crop Tool
The Crop tool lets you crop your photograph by selecting an area of the image file and removing it. This is a basic tool, and you’ll find yourself using this just as often as any other tool in Photoshop, especially in cases where you need to clean up some of the free space around the edges of your image.
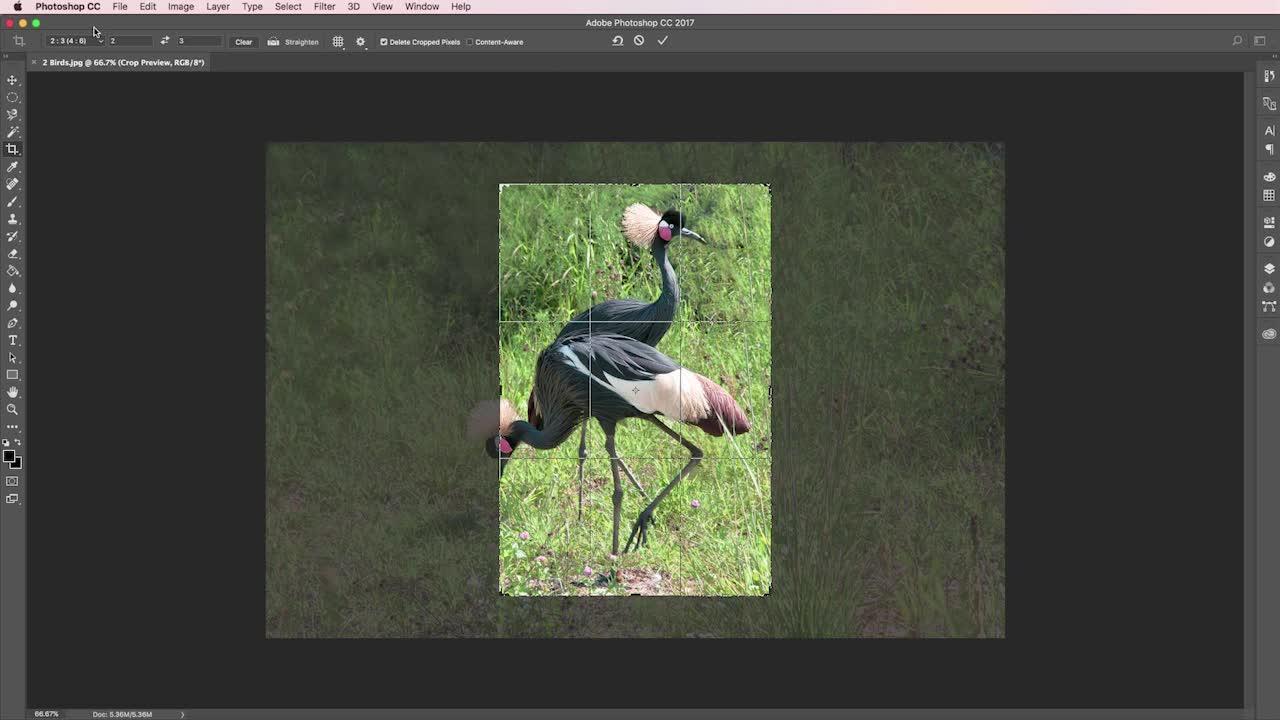
Click on the cropping icon from the side menu bar, and a crop box will appear around your file image. Select the small anchor boxes on the sides or corners of the crop box and drag the box over the area you would like to crop. To further adjust the crop box, simply click and drag from the top, bottom, sides, or corners. This allows you to eliminate outside space and to reshape the resulting image vertically or horizontally.
To constrain the crop to a certain size, start with the original image file, click on the Crop box icon, and then click on the Ratio icon at the top left of the screen. You will see a drop-down menu that allows you to crop your image to a predetermined size. Try experimenting with these various options.
To finish your edits, click the Return or Enter bar on your keyboard. Complete the editing process by clicking on the File menu at the upper left of your screen. Select Save As, type in the name of your image, then drop-down and choose Format. If you save your photo as a Photoshop or PSD file and check the Layers box, you can go back later on and continue editing. If you choose jpeg, your file will be saved in its final version.
Spot Healing Brush
One of the most important tools in Photoshop is the Spot Healing brush because it allows you to remove small impediments from your image without losing visual continuity. How many times have you taken a portrait of a friend only to find blemishes you wished you could remove? Or you’ve captured a beautiful landscape but see small blotches in the sky caused by specks of dust on the camera’s sensor. The Spot Healing brush will help you solve those problems.
Hover your cursor over the vertical tools panel on the right of your screen. Each tool will be identified with a pop out indicator. Locate the Spot Healing brush. Click on the icon and you now have your Spot Healing brush tool in hand. In the top upper left of your screen is a little white circle. Click on that circle and a drop-down menu will appear. Make sure the hardness is at 100% and the spacing at 25%. To the right of the white circle is the Mode, which should be set at Normal. To size your brush tool, use the bracket keys on your keyboard. If you hold down the left bracket, the brush size will reduce, while the right bracket will increase the size.
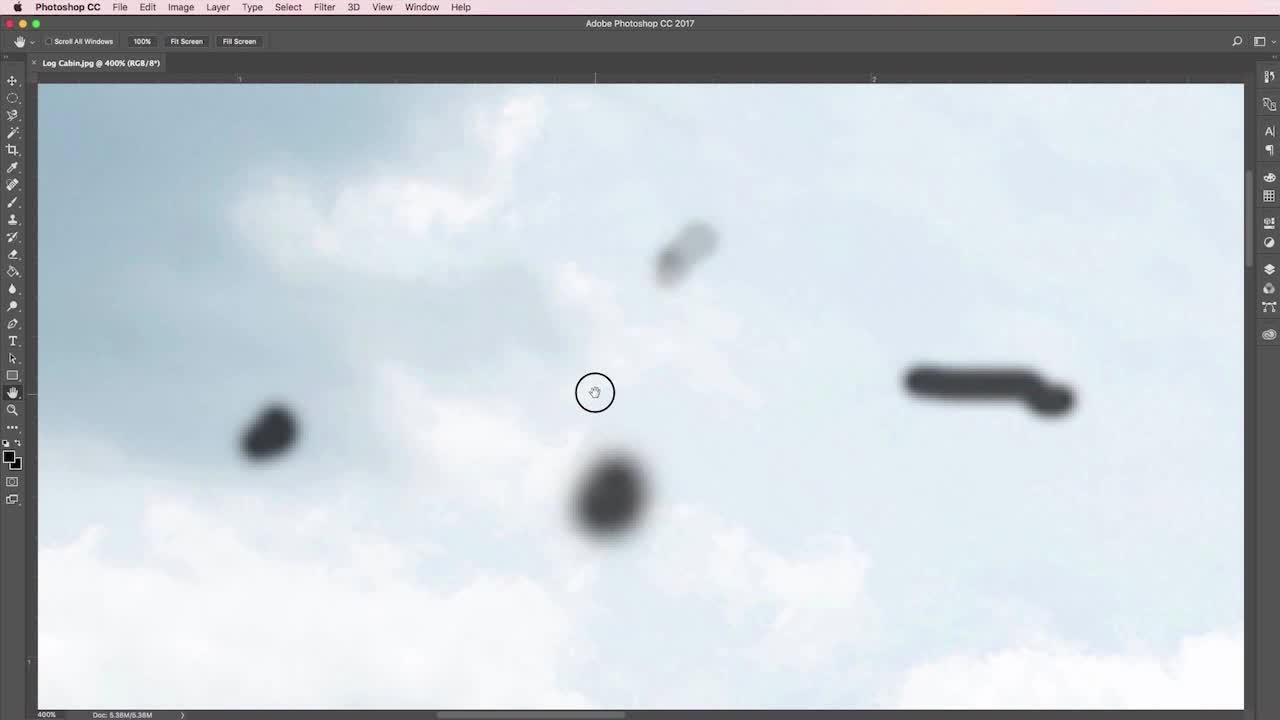
To begin the spot healing process, you will need to use the Zoom or magnifying tool at the bottom of the tools panel. Click on the icon, and then locate an area of your image where you want to remove spots. (Note: To move your file around on the screen, use the Hand tool located above the Zoom tool icon.) Press and hold the Zoom tool and your file image will enlarge. Next, go back to your Spot Healing brush icon and size your brush with the bracket keys, making sure it is slightly larger than the size of the spots you will remove.
Okay, the work is now ahead of you. Place your tool over each spot you want to eliminate, click and let go. The unwanted pixels will blend naturally into the area around it and disappear. If you want to undo a spot removal, click on the Edit menu, and choose Undo Spot Healing brush, and then start over. Using this process, proceed with the other spots until your chosen image area is spot-free. By clicking and dragging this tool, you can also remove longer or wider spots. Of course, you will need to use your Zoom tool from time to time to locate different areas. The spot healing process takes practice. Keep working with the tool until you achieve your own system of retouching.
Lighting, Colors, and Contrast
Like me, you’ve probably imported an image into Photoshop that looked great on your camera’s LCD screen only to find out it wasn’t bright enough or the colors appeared dull. You can solve some of these issues with simple adjustment layers.
Brightness and Contrast
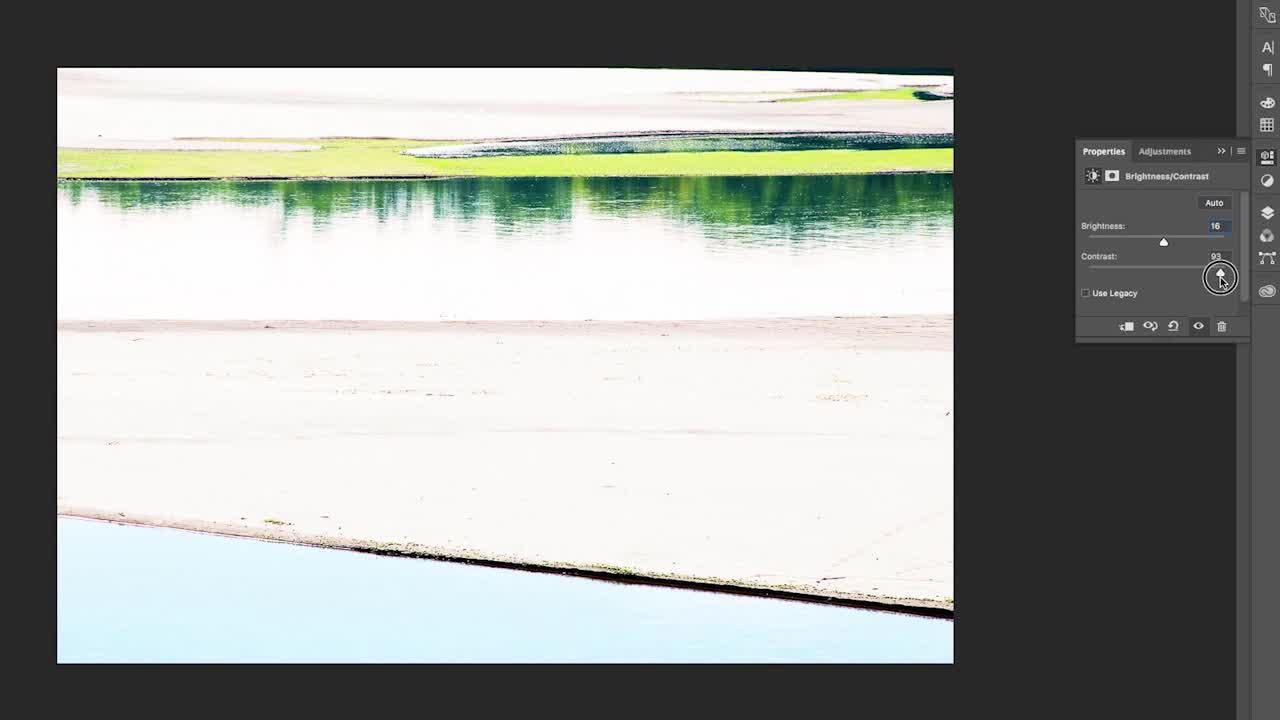
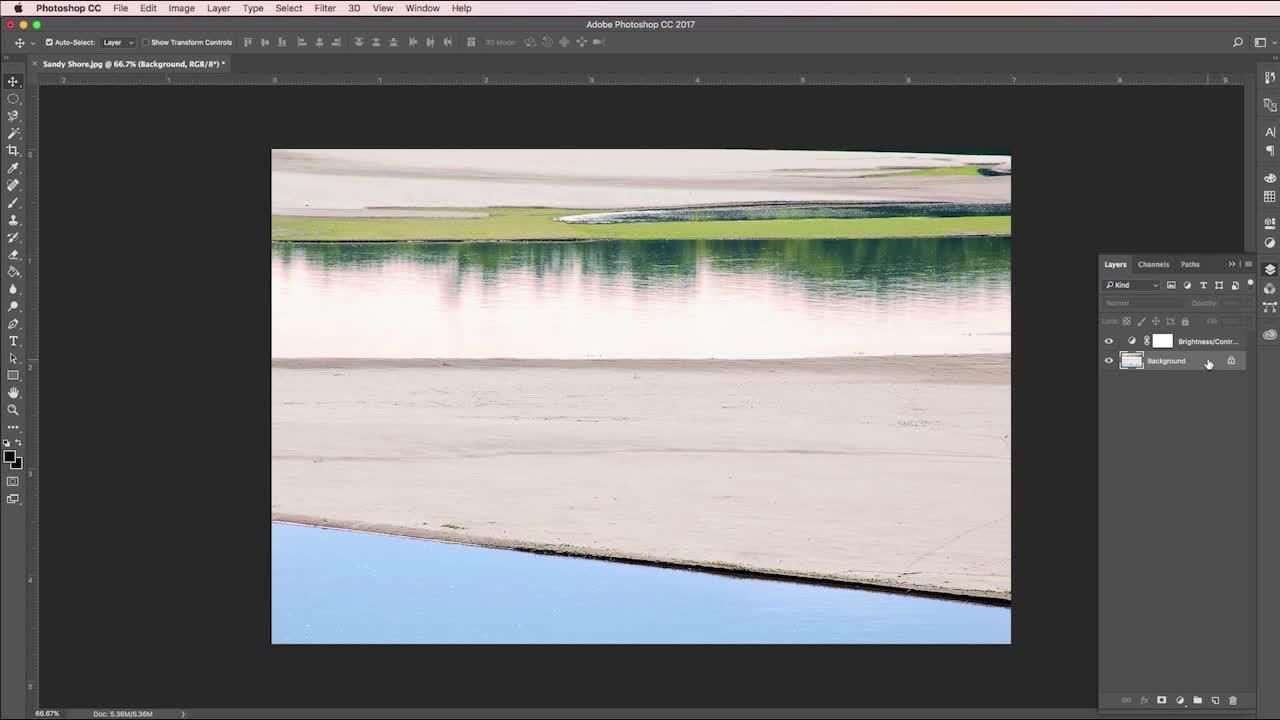
Click the half-moon circle at the bottom of your Layers panel. Then, click on Brightness/Contrast. A new layer will appear over your background photo layer. Think of this layer as a transparent sheet over your image. You can make adjustments on this layer, and it will eventually blend into your completed image. The properties panel offers you sliders to adjust contrast and brightness. Move these sliders slowly to the left or right until you are satisfied with the image’s contrast and brightness. You can also click on the Auto icon to have Photoshop makes the corrections for you. To see a Before & After, click on the visibility icon to the left of the adjustment layer.
Hue and Saturation
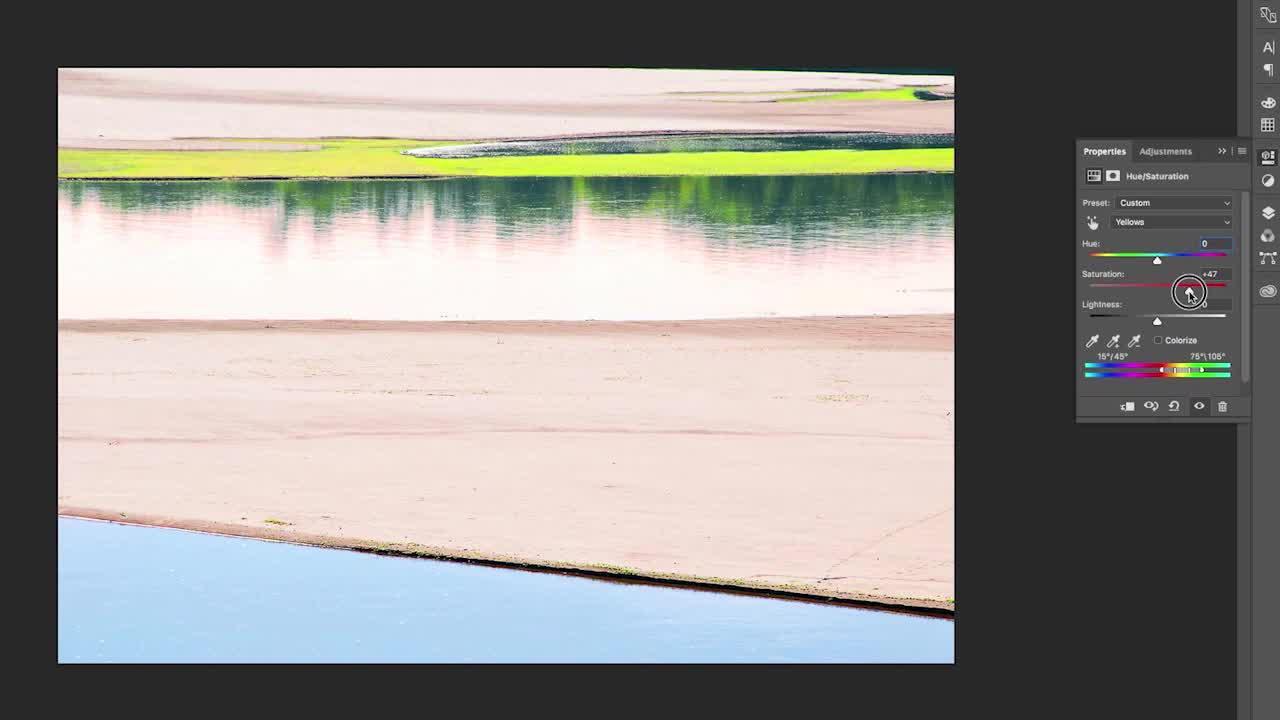
Drop down again to the half-moon icon, then click on Hue/Saturation, which will bring up another adjustment layer and the Hue/Saturation panel. If you click the box labeled Colorize, the Hue slider will be active, allowing you to alter the entire image in various hues. But leave that box blank and work only with the saturation slider, moving it left or right, depending how saturated you want your image. This will affect all the colors of the image. However, if you click on Master, located below Preset, you can choose individual colors to make saturation adjustments. Finally, you can then lighten or darken your image with the Lightness slider.
Edit an Adjustment
If you want to remove either of these two adjustment layers, click on the layer, then press the Delete or Backspace key on your keyboard. To resurrect that layer, choose Edit, then Undo Delete Layer. Under the Layers menu at the top of your screen, click on Flatten in the drop-down menu. This will blend the layers you have been working on and allow you to save your image file in the jpeg format as outlined in the Crop Tool section of this article.
Sharpening
What can you do if your image is not as clear and sharp as you would like? Photoshop provides Sharpen tools help you to improve your image for focus and clarity, but they will work only for images that are slightly blurry. You cannot fix blurred images.
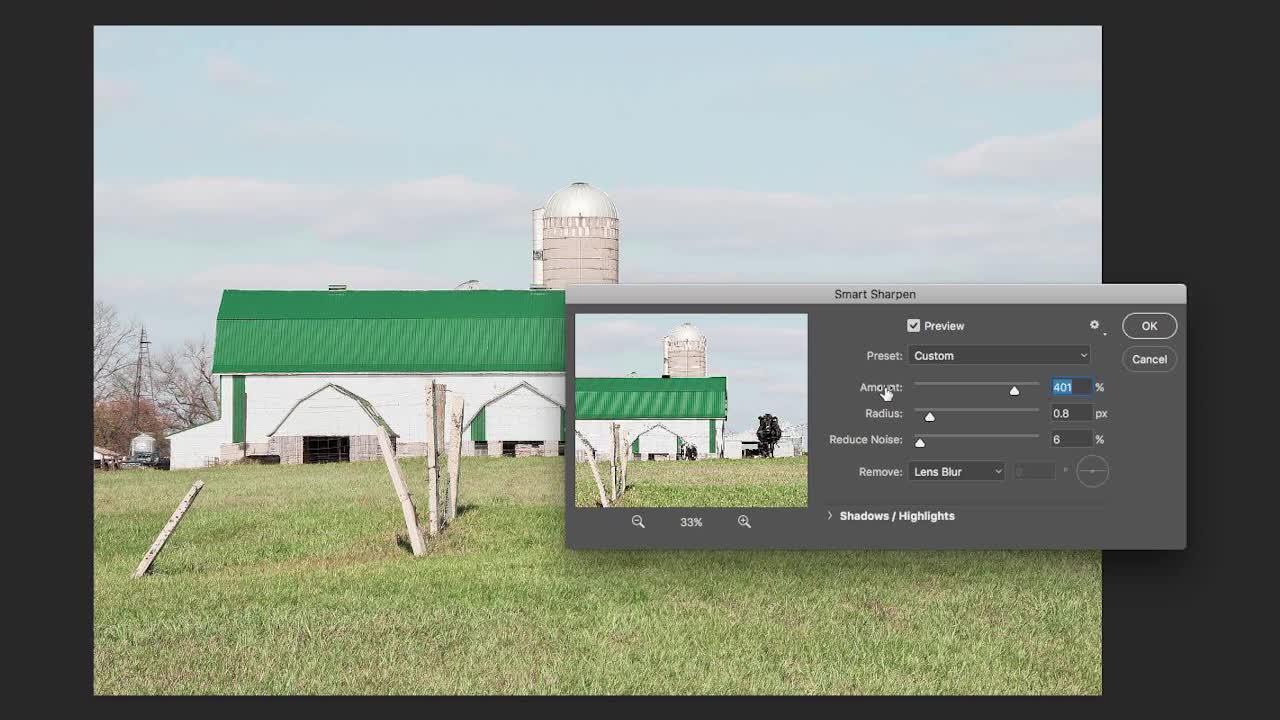
After you complete the editing and retouching process of your image, you may want to make this sharpening adjustment. At the top of the menu, click on Filter, and a drop-down menu will appear. Hover your cursor over Sharpen, then click on Smart Sharpen and the panel will open. You can click and drag on the preview picture on the left to identify any part of your image. Set the preset menu to Default and adjust the sliders to your preferences. Radius allows you to make the sharpening more obvious. (Try to keep this Radius setting at 3 or below.) Then, drag the Amount slider slowly left until you are satisfied with the results. Reduce Noise will adjust for annoying pixel speckles. To complete the process, click OK, and Photoshop sharpens the image.
The Crop tool, the Spot Healing brush, and the techniques of sharpening, lighting, colors and contrast are only a few of the many tools Photoshop offers to help you improve your images. Work with these basic photoshop tips for beginners you will be amazed at how your images can be improved.
About the author: For over thirty years, through his iconic American photographs, Tom Jenz has captured the spirit of vanishing America through its evaporating frontier icons: small towns, one-owner farms, country churches, fading signs, and the unusual characters that make up the wide-open spaces.
His book, FORGOTTEN AMERICA, Images & Thoughts, by Tom Jenz, came out in 2014. His fine art prints have appeared in various magazines galleries throughout the country.
Visit his website at TomJenzAmerica.com.
Have something to add to the story? Leave a comment or email editor@outdoorphotographyguide.com.

Share tips, start a discussion or ask other students a question. If you have a question for the instructor, please click here.
Already a member? Sign in
No Responses to “Photoshop Tips for Beginners”